Appearance
Image Sources
Image Sources define how users can provide the image your application needs. Choose sources around the user situation first, then wire the matching sources value.
| User situation | Source option |
|---|---|
| The user is on a phone and should take a selfie-style image | Front camera |
| The user needs the back camera, for example for higher camera quality or another person helping with capture | Back camera |
| The user already has a usable image, or you need a fallback when there's no camera, camera access is denied, or the user prefers not to capture a photo | Upload |
| The user starts on desktop and could continue capture on a mobile phone (required or optional, depending on your launch settings) | Companion flow |
Use the sources API to customize the user flow. If property is left empty, the default option will be used. See all available options below.
Start with Front (Selfie) Device Camera default
This is the default source and the recommended starting point for most face and skin-analysis experiences because it matches the familiar selfie capture pattern.
tsx
tsx<hautai-liqa license ="LICENSE_KEY_PROVIDED_BY_HAUT.AI"sources ="front_camera" > </hautai-liqa >
tsx<hautai-liqa license ="LICENSE_KEY_PROVIDED_BY_HAUT.AI"sources ="front_camera" > </hautai-liqa >
Backward compatibility: "camera" = "front_camera"
Previously, the default option was known as "camera" image source and it started front (selfie) device camera.
To maintain the backward compatibility for most of current users, this old API parameter is still supported and it equals to "front_camera". Still we recommend using the "front_camera" parameter for better clarity.
How it works
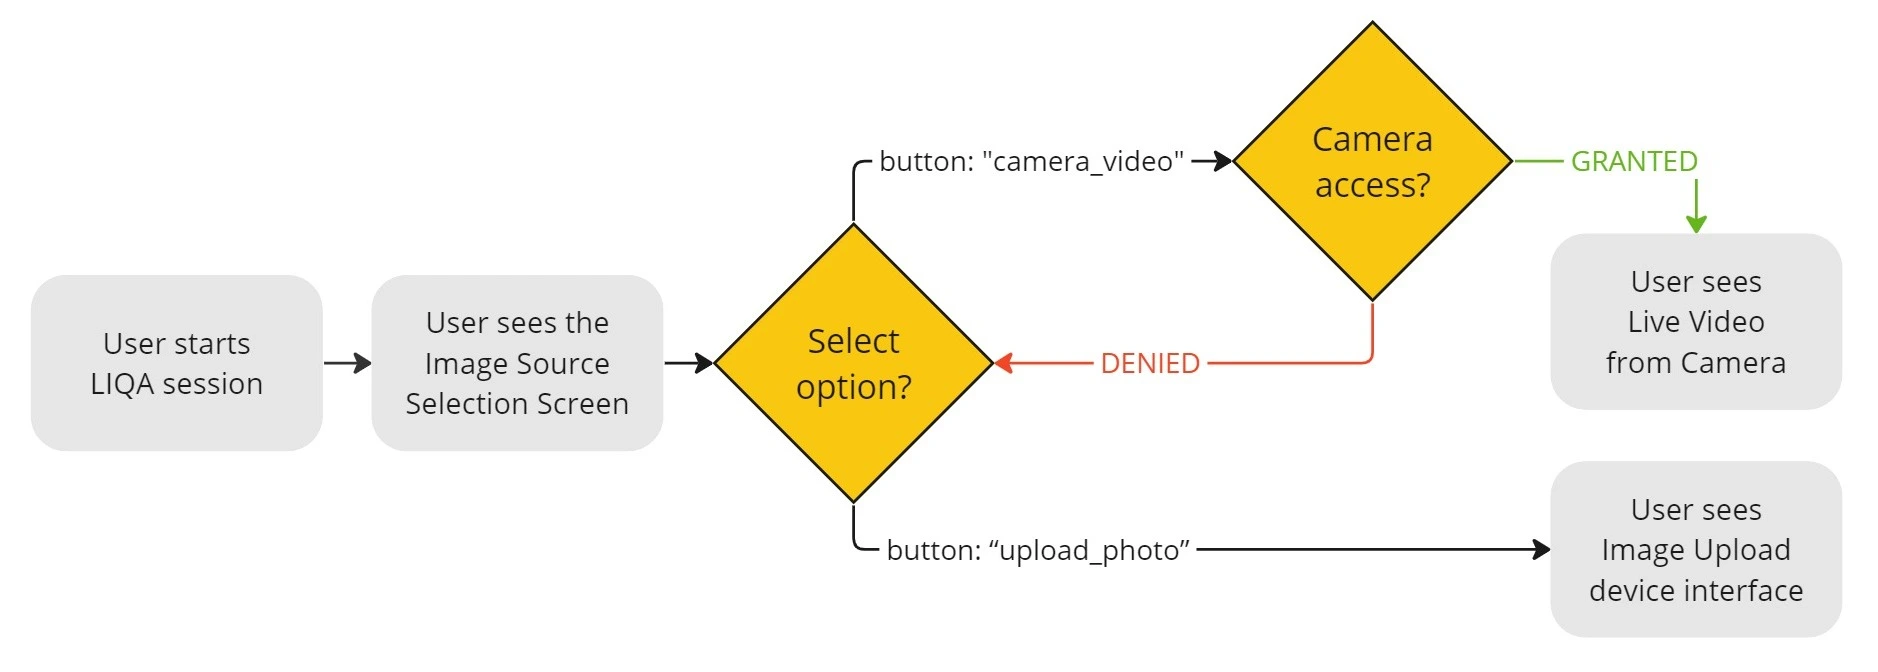
- When the LIQA session starts, the user is immediately prompted to allow access to the camera with a native browser dialog.
- When the user allows camera access, the front camera video feed is started and the user can interact with the LIQA AR interface and take a photo.
- If the device has at least one back camera available and back_camera source is provided, the user will be able to switch between front and back cameras by tapping the switch button in the LIQA interface during LIQA session. The button can be styled, check the relevant CSS selector.
Supported fallbacks
- If the user denies access to the front camera, LIQA shows the camera access denied screen. The upload option appears there only when
uploadis also included insources; otherwise LIQA shows a neutral Close action. - If the device has no cameras available at all, LIQA offers upload only when
uploadis also included insources; otherwise LIQA shows a camera unavailable screen with a neutral Close action.
Full user flow for this option
Start with Back (Main) Device Camera
Use the back camera when your workflow benefits from the back camera optics, a helper taking the photo, or capture situations where the front camera is not the best source.
tsx
tsx<hautai-liqa license ="LICENSE_KEY_PROVIDED_BY_HAUT.AI"sources ="back_camera" > </hautai-liqa >
tsx<hautai-liqa license ="LICENSE_KEY_PROVIDED_BY_HAUT.AI"sources ="back_camera" > </hautai-liqa >
How it works
- When LIQA session starts, the user is immediately prompted to allow access to the device camera with a native browser dialog.
- When the user allows camera access, the back camera video feed is started and the user can interact with LIQA AR interface and take a photo.
- If the device has at least one front camera available and front_camera source is provided, the user will be able to switch between back and front cameras by tapping the switch button in the LIQA interface during LIQA session. The button can be styled, check the relevant CSS selector.
Preset-specific support
Multiple back camera support device-specific feature
If the device has more than 1 back camera (e.g. smartphone with 2+ camera lenses), LIQA will automatically select the one camera that suits best for portrait photos.
Example
iPhone 15 has 3 back cameras: 1 Back, 2 Back Ultrawide (zoomed-out), 3 Back Telephoto (zoomed-in, macro). LIQA always selects 1 Back camera for portrait photos.
Focus auto-switch (macro lens) OS version-specific feature
For some latest iOS devices, LIQA can automatically detect the need to switch to a macro lens when the face is detected at a very close distance. When the user's face moves away from the back camera, LIQA will automatically switch back to the main lens.
UX notice
The lens switch moment might be noticeable to the user by a slight change in video feed appearance. The switch is necessary to make sure that the user's face is captured in the focus.
Supported fallbacks
- If the user denies access to the back camera, LIQA shows the camera access denied screen. The upload option appears there only when
uploadis also included insources; otherwise LIQA shows a neutral Close action. - If the device has no cameras available at all, LIQA offers upload only when
uploadis also included insources; otherwise LIQA shows a camera unavailable screen with a neutral Close action.
Full user flow for this option
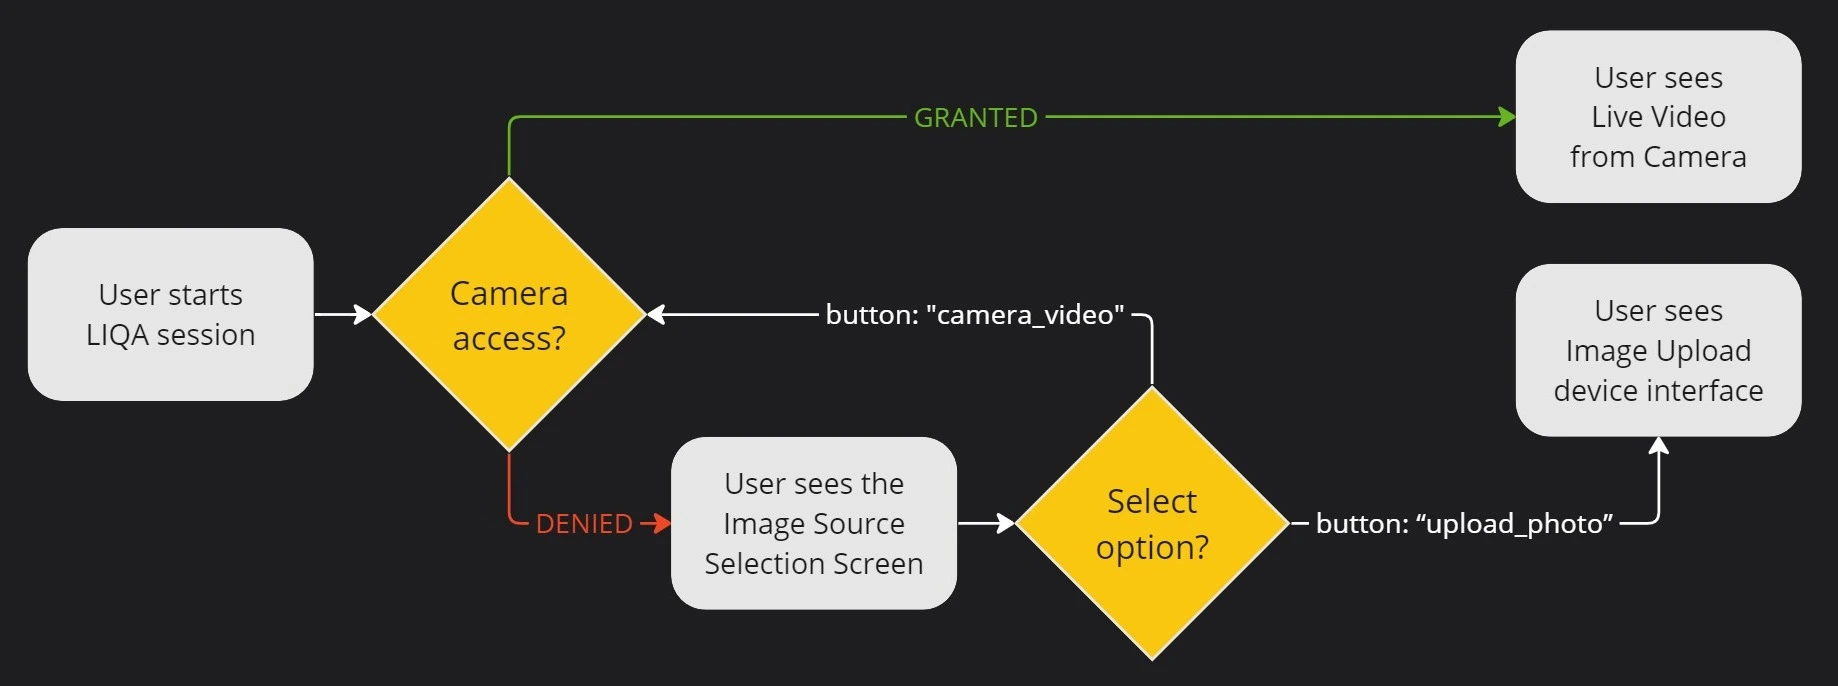
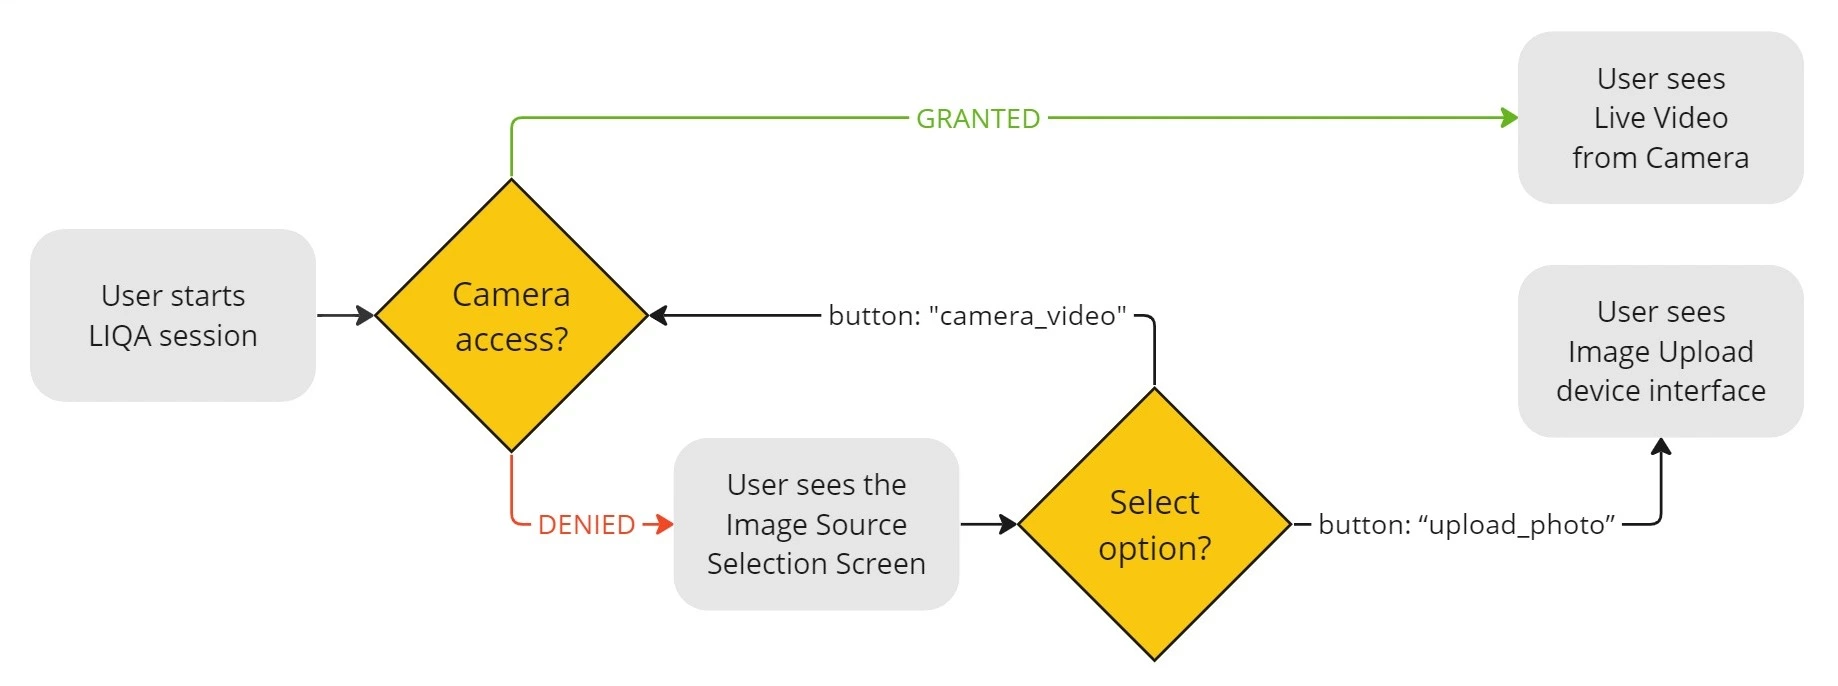
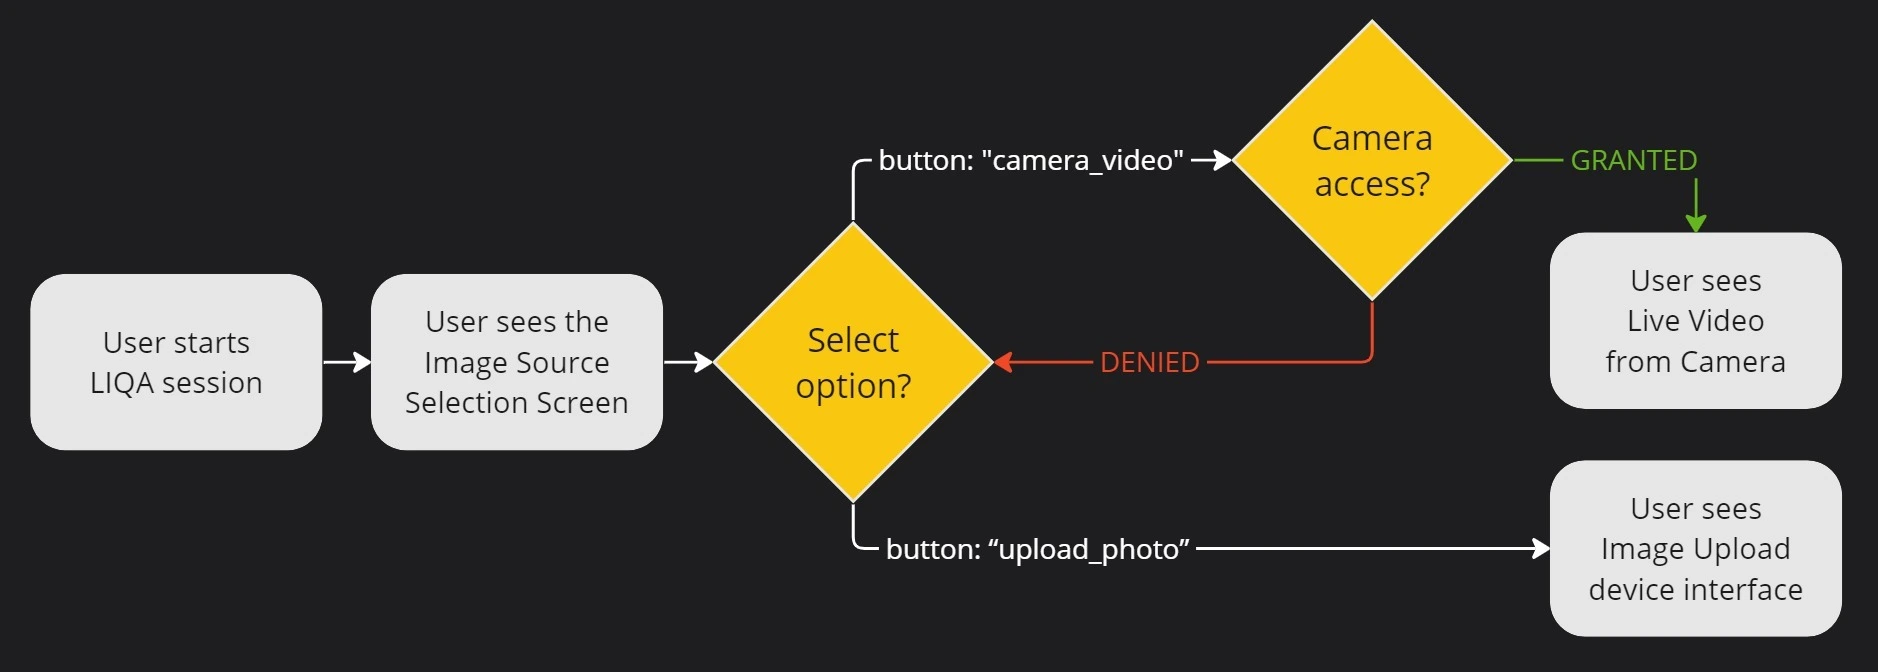
Allow uploading photos from device gallery optional
Use upload when your product should give users flexibility or a fallback path. It can reduce drop-off when camera access is denied or when users already have a suitable image.
By default, uploading of photos is not allowed to the user and is not added automatically as a camera fallback. To allow upload in the source-selection screen or after camera permission/device failures, include upload in sources together with the camera source.
Tutorial requirement
Regular tutorial/banner UI (tutorial="video", tutorial="image", or a custom tutorial JSON array) requires sources to include a camera source (front_camera or back_camera) and upload. If upload is not present, tutorial settings are ignored for the regular source-selection flow.
Exception: entry-point="tutorial-alt" can show the tutorial immediately with a camera-only config, including single-source setups and companion flow. See the Tutorial and Two-Device Flow guides for supported values and examples.
To enable the photo upload option as a part of default user flow part, add the upload image source for the selected camera source:
tsx
tsx<hautai-liqa license ="LICENSE_KEY_PROVIDED_BY_HAUT.AI"sources ="front_camera,upload" > </hautai-liqa >
tsx<hautai-liqa license ="LICENSE_KEY_PROVIDED_BY_HAUT.AI"sources ="front_camera,upload" > </hautai-liqa >
tsx
tsx<hautai-liqa license ="LICENSE_KEY_PROVIDED_BY_HAUT.AI"sources ="back_camera,upload" > </hautai-liqa >
tsx<hautai-liqa license ="LICENSE_KEY_PROVIDED_BY_HAUT.AI"sources ="back_camera,upload" > </hautai-liqa >
How it works
- When LIQA session starts,
source-selectionscreen is displayed to the user. On this screen the user can select one of two options: use camera (front/back/both, depending on the passedsources) or upload photo from the device gallery. - When the user selects to use camera, the user flow is the same as for the selected camera source (front camera, back camera).
- When the user selects to upload a photo, the user is able to select and upload any photo from the device gallery.
Preset-specific support
Full user flow for this option
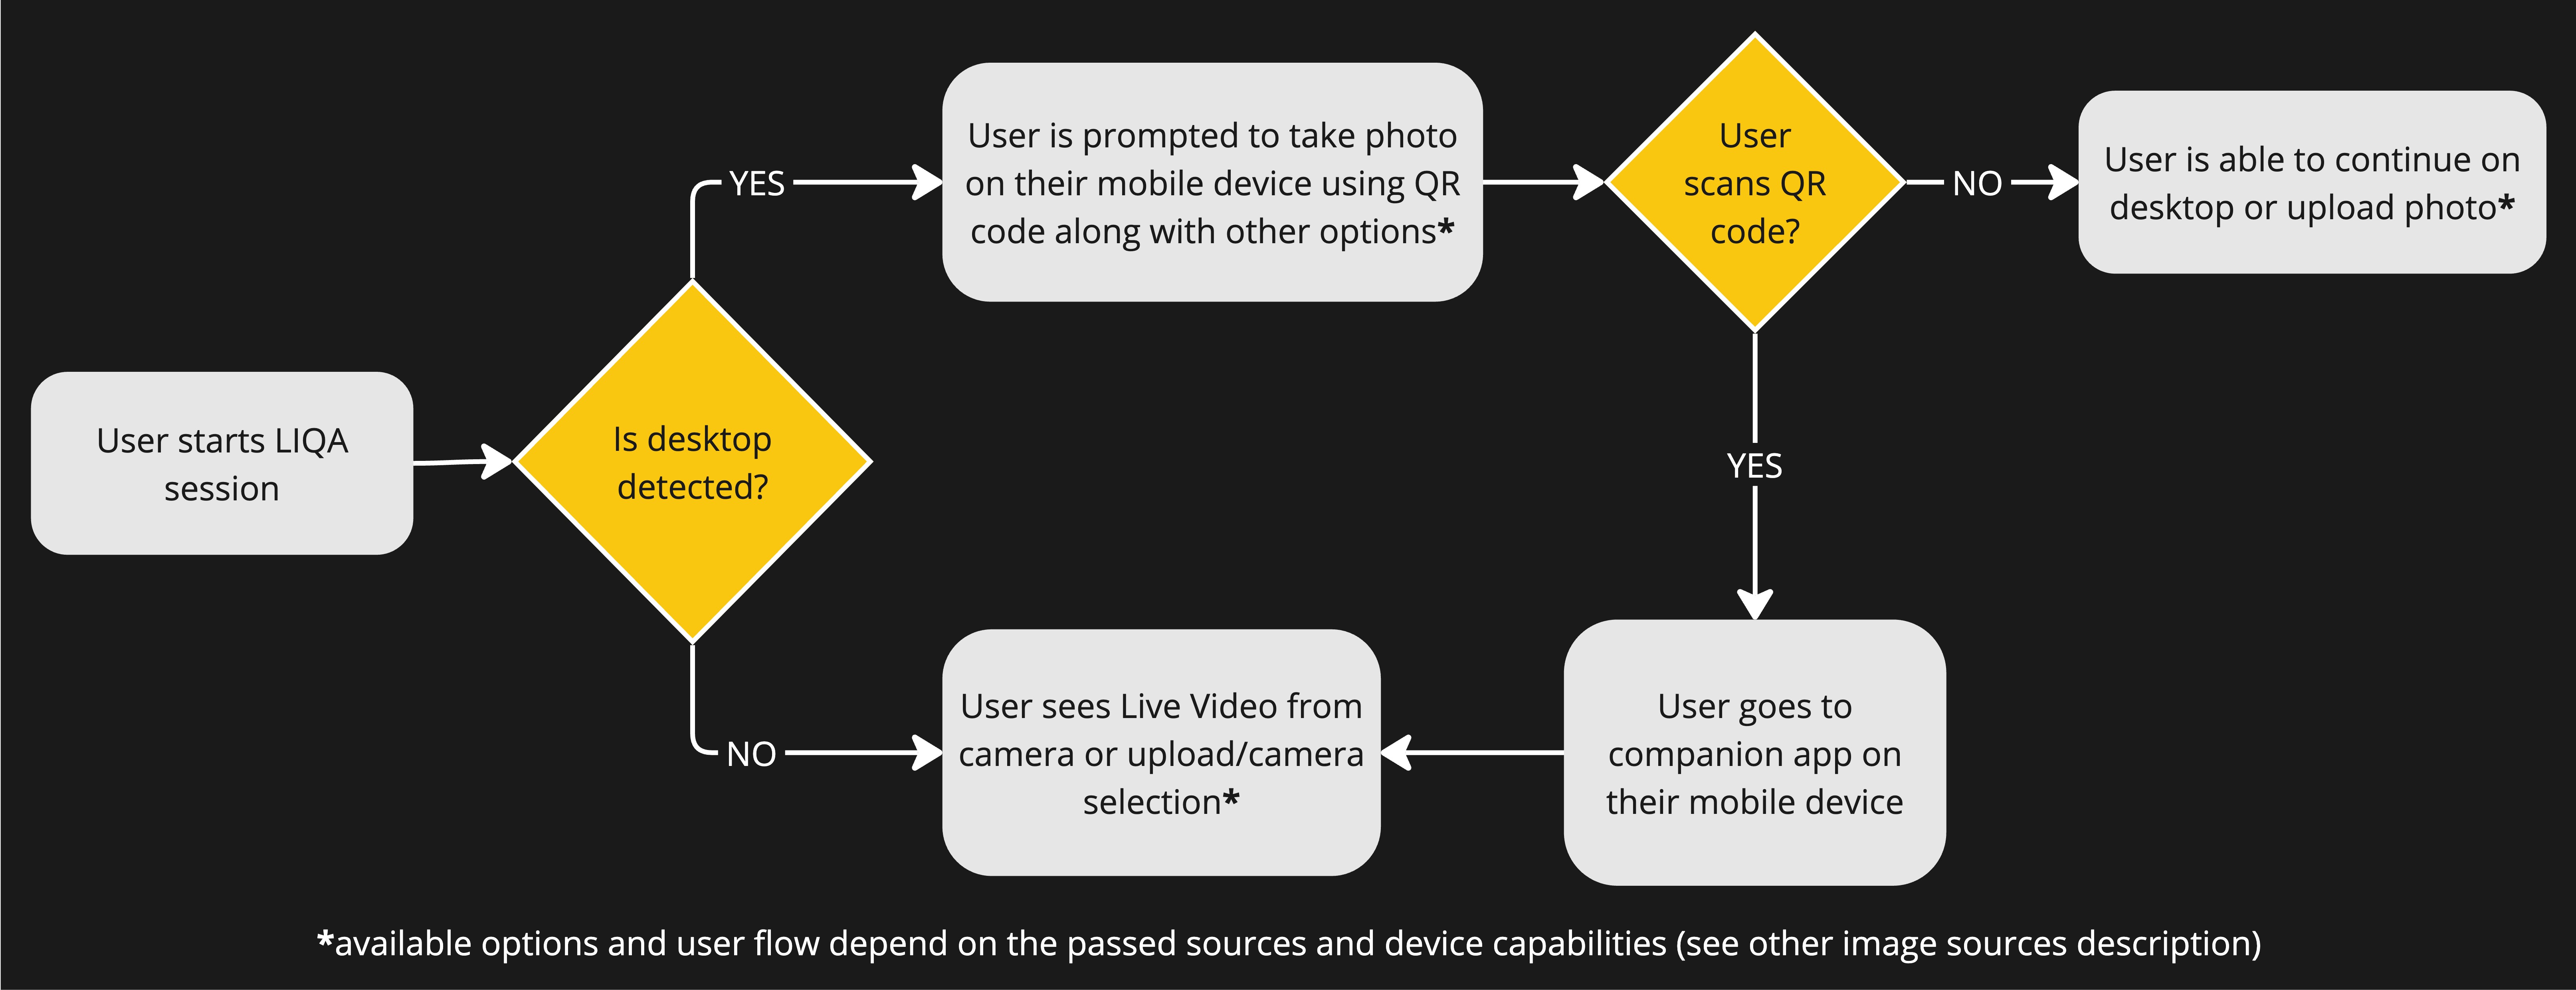
Allow taking photo on mobile device (companion flow) optional
Use companion flow when a user begins on desktop but should capture on a phone for better camera quality, mobility, and lighting control.
To enable the companion flow, add companion image source to the web-component's sources attribute:
The full description of this feature is located on Two-Device Flow page.
tsx
tsx<hautai-liqa license ="LICENSE_KEY_PROVIDED_BY_HAUT.AI"sources ="front_camera,upload,companion" > </hautai-liqa >
tsx<hautai-liqa license ="LICENSE_KEY_PROVIDED_BY_HAUT.AI"sources ="front_camera,upload,companion" > </hautai-liqa >
How it works
- When LIQA session starts and it detects that the session is initiated on desktop, LIQA displays
source-selectionscreen and prompts to scan a QR-code to take photo on user's mobile device. If LIQA doesn't detect that the session was started on desktop, the user goes through the usual LIQA flow (front camera, back camera, upload). - When the user scans QR-code and goes to the provided link, they go through the usual LIQA flow on the mobile device. The companion app configuration is identical to the one on the desktop, including
styles,i18n,preset,sourcesetc. - Once the photo is taken on the mobile device, the desktop LIQA receives this photo and emits
captureevent.
Full user flow for this option